
Table of Contents
Table of Contents
The Newbie’s Shopping for Information to Brushes for Nail Design
If in case you have just lately fallen down the rabbit gap of DIY nail artwork on TikTok, you might have in all probability already realized that the tiny brush connected to the cap of your nail polish bottle is totally ineffective. You can’t paint a fragile French tip or a tiny floral sample with a brush that appears like a miniature broom.
So, you go to Amazon, seek for “brushes for nail design,” and you’re instantly hit with overwhelming decisions. There are packs of three brushes for 5 {dollars}, and single brushes for 50 {dollars}. There are silicone brushes, pure hair brushes, flat brushes, and brushes that appear to be needles. The descriptions are filled with bizarre terminology like “Kolinsky hair” and “dimension 10 oval.” It is sufficient to make you hand over earlier than you even begin.
Shopping for the precise instruments is the distinction between a messy, irritating afternoon and a flawless, professional-looking manicure. You do not want to purchase an enormous thirty-piece equipment. You truly solely want a number of particular instruments. Right here is absolutely the newbie’s shopping for information to navigating the complicated world of nail artwork brushes.
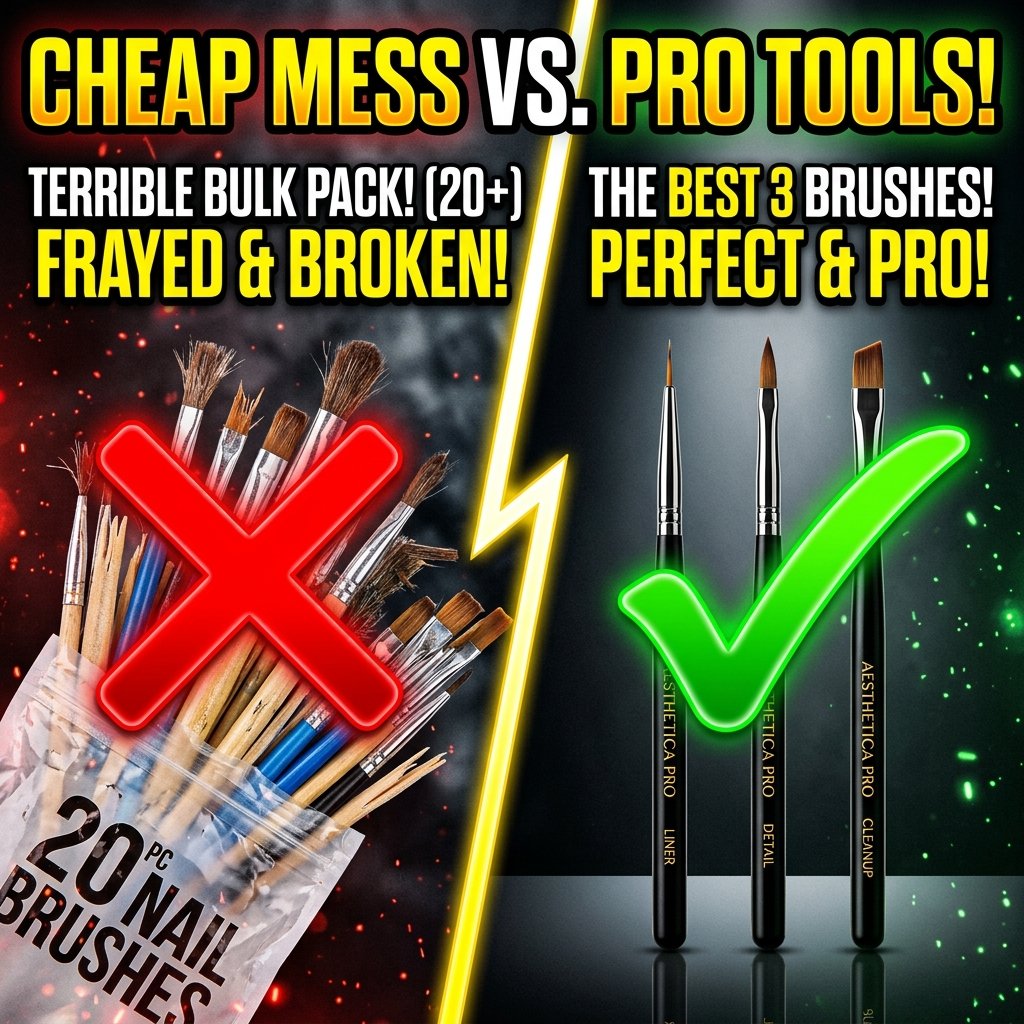
1. Do not Fall for the Large Selection Packs
If you end up a newbie, it’s extremely tempting to purchase these huge kits on Amazon that include twenty-five completely different brushes, 5 dotting instruments, and striping tape, all for twelve {dollars}. It appears like you’re getting an enormous deal.
In actuality, you’re getting twenty-five horrible brushes. The bristles on these low cost bulk packs are often badly glued, which means they’ll instantly begin shedding hairs into your moist polish. The steel ferrules (the half that connects the hair to the deal with) will come free after one week, and the comb heads will actually fall off while you’re portray.
Extra importantly, you do not want twenty-five brushes. Skilled nail techs often solely maintain 4 or 5 extremely trusted brushes on their desk. As a substitute of spending fifteen {dollars} on an enormous pack of rubbish, spend fifteen {dollars} on three high-quality, particular person brushes. They may final you for years, and they’re going to truly carry out the way in which you want them to.
2. The Solely Three Brushes You Truly Want
If you’re simply beginning out, pare your procuring record down to those three necessities. With these three instruments, you possibly can execute 99% of the nail artwork designs at present trending on-line.
The 9mm or 11mm Liner Brush
That is the workhorse of your assortment. You desire a liner brush that’s extremely skinny, with lengthy bristles. The 9mm or 11mm size is ideal as a result of the lengthy hairs act as a shock absorber to your hand. When your hand inevitably shakes, the lengthy bristles drag easily behind it, creating a superbly straight line. You’ll use this for French suggestions, lengthy stripes, and drawing delicate geometric bins.
The 5mm Element Brush
You want a tiny, short-bristled brush for the microscopic work. As a result of the hairs are so quick, they’re stiffer and do not bend as simply. This offers you absolute management. You utilize this brush like a fine-tipped pen to attract tiny hearts, flower petals, or write small letters. In case you attempt to use a protracted liner brush for tiny particulars, the lengthy hairs will flop over and smear the polish.
The Flat Cleanup Brush
Nail artwork is 50% portray and 50% erasing your errors. You want a brief, flat, barely angled brush with very stiff bristles. You do not put polish on this brush. As a substitute, you dip it in pure acetone and run it across the edges of your nail to wash up any polish that by chance flooded onto your pores and skin. It provides your manicure that razor-sharp, salon-quality end.
3. Artificial vs. Kolinsky (The Nice Debate)
Once you begin procuring, you will note the phrase “Kolinsky” thrown round quite a bit. Kolinsky is a kind of pure animal hair (often from a Siberian weasel). It’s extremely costly, and for a really very long time, it was thought of absolutely the gold commonplace within the nail trade.
Right here is the reality: until you’re a licensed nail technician constructing thick acrylic nail extensions from scratch utilizing liquid monomer and powder, you do not want a Kolinsky brush. In reality, when you use common nail polish or gel polish with a Kolinsky brush, you’ll in all probability smash it.
For DIY nail artwork, portray swirls, and drawing strains with gel or common polish, artificial nylon brushes are literally superior. Artificial hair doesn’t take in the liquid; it simply lets the polish sit on the surface of the bristles, which implies it flows off the comb a lot smoother whenever you paint. Artificial brushes are additionally less expensive, cruelty-free, and simpler to wash.
4. The Cap is Non-Negotiable
If you end up taking a look at completely different brush manufacturers, solely purchase brushes that include a steel or plastic cap that snaps securely over the bristles.
In case you purchase brushes that simply have a deal with and uncovered bristles, they’re going to get destroyed in your make-up bag. The bristles will get bent sideways, and as soon as a liner brush will get bent, it’s fully ineffective. You can’t straighten it again out.
Moreover, in case you are utilizing gel polish, you completely should have a cap. Gel polish doesn’t dry within the air; it cures underneath UV gentle. In case you depart a brush sitting in your desk with even a microscopic hint of gel polish left within the bristles, the ambient daylight coming via your window will slowly remedy the polish, turning your delicate brush right into a strong rock of plastic.
5. Learn how to Put together a Model New Brush
Once you lastly get your new brushes within the mail, don’t instantly stick them right into a bottle of polish. When brushes are manufactured, the factories dip the bristles in a really stiff, clear starch glue to maintain them completely formed throughout transport. In case you do not take away this glue, your brush will not take in polish correctly.
Once you take the comb out of the bundle, the bristles will really feel exhausting, like a needle. Take your thumb and gently flick the bristles forwards and backwards till the white, dusty starch breaks up. Then, take a lint-free wipe soaked in a bit little bit of rubbing alcohol and gently wipe the bristles to take away the remainder of the residue. Now the comb is mushy, versatile, and able to use.
6. The Golden Rule of Cleansing
The way you clear your brushes determines whether or not they final for 3 years or three days. The foundations are fully completely different relying on what sort of polish you’re utilizing.
If you’re utilizing conventional, air-dry nail polish, you should clear the comb instantly with a delicate, non-acetone polish remover. Don’t use pure 100% acetone in your artwork brushes until completely obligatory, as a result of pure acetone will severely dry out the artificial nylon hairs, inflicting them to fray and cut up on the ends.
If you’re utilizing gel polish, by no means use remover or acetone in any respect. As a result of gel would not dry within the air, you truly clear the comb utilizing clear gel. Put a drop of clear gel base coat on a chunk of tin foil. Swirl your soiled, coloured brush into the clear gel till the colour bleeds out. Wipe the comb on a lint-free paper towel, form the bristles again into a pointy level along with your fingers, and put the cap on. Leaving a tiny quantity of clear gel within the bristles truly retains them hydrated and formed completely for subsequent time.
7. Deal with Them Like Your Make-up Brushes
You would not spend forty {dollars} on an costly basis brush after which throw it free into the underside of a unclean drawer. Deal with your nail artwork brushes with the identical stage of respect.
Preserve them saved flat or upright in a cup with the bristles pointing towards the ceiling. By no means relaxation them face down in a cup of liquid. In case you spend money on simply three good brushes and take the time to wash them correctly after each single manicure, you’ll by no means should wrestle with thick, messy nail artwork ever once more.


One comment on “Brushes for Nail Design: The Ultimate DIY Buying Guide”