
Brushes for Nail Design: The Ultimate DIY Buying Guide

Based on our hands-on testing and professional beauty care experience, Let me tell you something honest about doing your own manicures at home. If you find yourself struggling to paint clean lines, stop blaming your lack of talent. Investing in proper brushes for nail design changes everything.
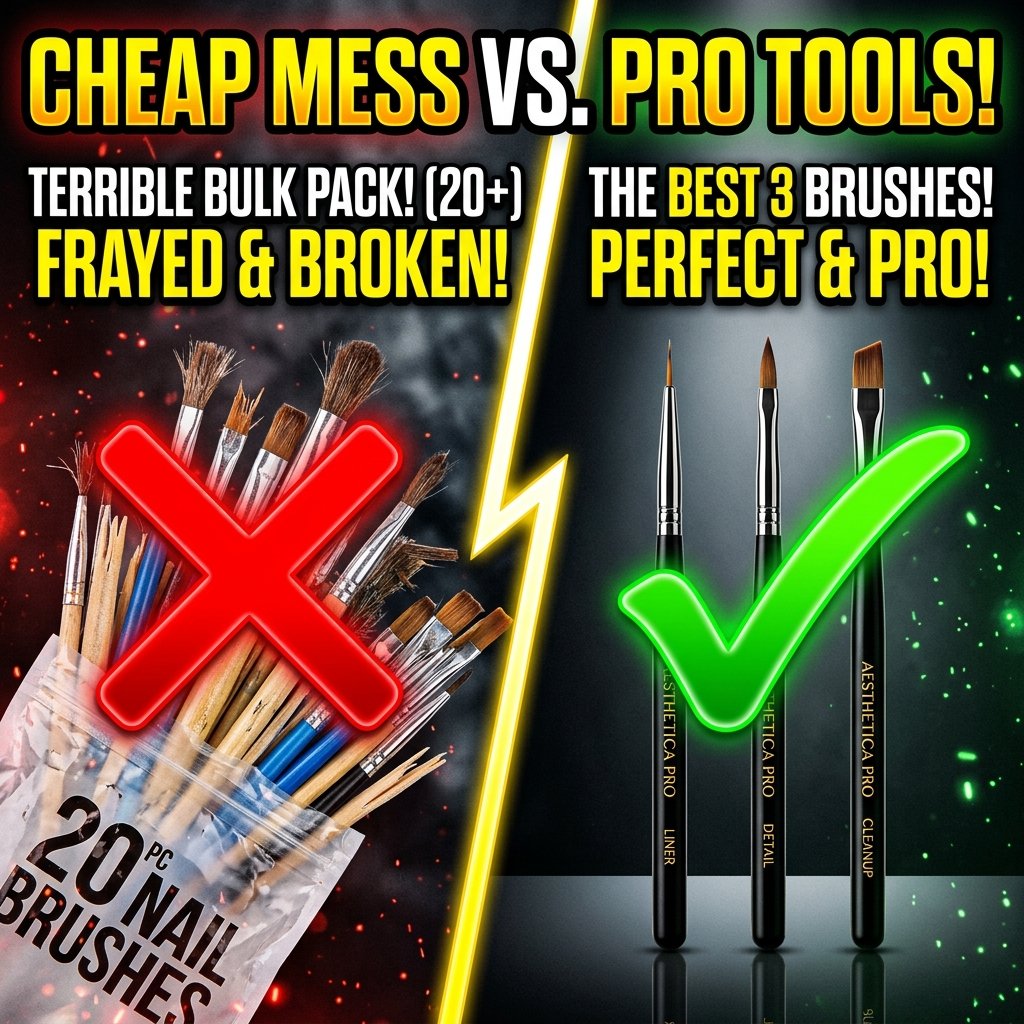
You stop fighting the polish and start actually controlling where it goes. I spent years buying cheap multipacks online. They shed hairs into my wet topcoat and frayed after two uses.
“Consistency and gentle barrier care are far more effective in skincare and beauty routines than aggressive quick-fix treatments.”
– Dermatological & Beauty Care Insights
It was deeply frustrating. Then I finally bought professional grade tools. The difference was night and day.
Most beginners buy a pack of twenty tools for five dollars. They assume having more options will make them better artists overnight. That is a massive trap. You only need three or four really good shapes to do almost any pattern.
“Self-care isn’t a luxury; it’s a foundational daily ritual that restores mental balance and physical vitality.”
– Wellness & Beauty Philosophy
A single high quality liner will outlast a dozen cheap ones. It will also hold its shape when you dip it into thick gel. Cheap plastic bristles curl at the tips immediately. They repel the paint instead of holding a steady bead.
I want to walk you through exactly what you need to know. We are going to talk about shapes, materials, and how to stop ruining your investment. Yes, you are probably cleaning them wrong right now. Acetone is not always your friend.
I will explain why later. Building a proper kit takes time and patience. Let us start with the absolute basics so you can stop wasting money on bad equipment.
The truth about brushes for nail design
There is a massive industry built around selling you things you do not need. The beauty space is notorious for this. Brands push huge kits packed with tools you will never touch. Have you ever looked at a fan brush and wondered what it actually does?
Most people use it once for a messy glitter gradient. Then they toss it in a drawer forever. You do not need a massive kit. You need a curated set of brushes for nail design that work hard for you.
The secret that professionals know is consistency. When you use the same high quality tool every day, you learn how it behaves. You learn exactly how much pressure to apply for a thin line. You learn how much gel it picks up.
When you constantly switch between cheap tools, you never build that muscle memory. You are always guessing how the bristles will react. This makes learning new techniques incredibly difficult. It is why so many people give up on hand painted art entirely.
I highly recommend focusing on quality over quantity. Buy one excellent liner before you buy anything else. Practice drawing straight lines on a practice tip. Get a feel for the weight of the handle.
A well balanced handle prevents hand fatigue during long painting sessions. Cheap plastic handles often feel hollow and awkward. A good tool feels like an extension of your hand.
Understanding synthetic versus natural hair bristles
This is a debate that confuses a lot of beginners. You will see terms like kolinsky and synthetic nylon thrown around constantly. Natural hair holds liquid much better than plastic. It absorbs monomers and thinners very efficiently.
This makes natural hair ideal for acrylic application. However, we are talking about painting art, not building extensions. For detail work, the rules change entirely. You do not always want the bristles to absorb your product.
When you are working with gel paint, synthetic bristles are usually better. Gel does not dry in the air. It sits on the tool until you cure it or wipe it away. Synthetic nylon fibers are smooth and non porous.
The thick gel glides off them easily onto the nail plate. Natural hair will absorb some of that gel. This makes the tool heavy and difficult to clean later. You end up wasting product and ruining the tool.
There are exceptions, of course. Some artists prefer a blend of natural and synthetic fibers. This gives you the snap of plastic with the flexibility of hair. But if you are just starting out, stick to high quality synthetics.
They are cheaper to replace if you make a fatal mistake. They also hold up better to harsh cleaners. Just make sure the manufacturer specifies they are meant for gel art. Not all synthetics are created equal.
If you prefer regular air dry polish, the game changes again. Regular polish dries fast. You need a tool that can hold a decent amount of liquid and lay it down quickly. Natural hair can sometimes perform slightly better here.
But honestly, most modern synthetic brushes for nail design are fantastic for both mediums. Technology has improved drastically in the last five years. You no longer have to spend fifty dollars to get decent performance.
The essential shapes you actually need
We established that massive kits are a waste of money. So what should you actually buy? You can create beautiful, complex art with just three specific shapes. Once you master these, you can add more specialized tools later.
Do not overwhelm yourself in the beginning. Focus on the core trio. Here is exactly what I keep in my daily rotation right now.
The ultra fine liner
This is the star of the show. A long, thin liner is absolute magic for painting crisp lines. You want one that is about nine to twelve millimeters long. It should have very few bristles.
The longer the hair, the easier it is to paint a straight line. The tool absorbs the small tremors in your hand. Short liners are meant for tiny details like eyes or dots. Long liners are for sweeping curves and geometric shapes.
When you load a liner, you must pull it through the gel slowly. Do not just dab it into the pot. Drag the bristles through the paint to coat them evenly. This prevents a thick blob from forming at the tip.
You want a uniform coating of product from the base to the point. This technique takes practice. Once you get it, you will never struggle with French tips again. Great brushes for nail design make this process feel utterly effortless.
If you want to read more about maintaining healthy hands while doing art, check out this guide on building a solid nail care routine. Keeping your cuticles healthy frames your art beautifully.
A perfect painted line looks terrible next to dry, cracked skin. Always prioritize skin health first. The art comes second.
The flat square brush
A flat square shape is incredibly versatile. It is flat and wide with a blunt edge. You can use it to clean up messy polish around the cuticles. You can also use it for one stroke painting techniques.
By loading two different colors on either corner, you can paint beautiful blended petals. It is an absolute staple for floral designs. You can also use it to pat down chunky glitter so it lays perfectly flat.
I also use my flat square for applying builder gel overlays. It spreads thick viscosity gels beautifully without creating air bubbles. You want one that has some stiffness to it. If the bristles are too soft, they will just bend under the weight of the gel.
You need enough tension to push the product around the nail plate. Look for one made with firm nylon fibers.
Keep one flat tool exclusively for clear gels and another for colors. Mixing them is a recipe for disaster. Dark pigments love to hide in the base of the bristles. They will inevitably bleed into your crystal clear builder gel later.
Save yourself the headache. Label the handles with a piece of tape so you never mix them up. It is a simple trick that saves hours of frustration.
The cleanup brush
This is the tool that makes an amateur manicure look truly professional. A good cleanup tool is stiff, angled, and durable. You dip it in acetone to carve out the perfect curve around the cuticle. It erases mistakes instantly.
No one paints perfectly every time. We all flood the cuticle occasionally. The difference is that professionals clean it up before curing. Amateurs let it cure onto the skin.
Do not use a fluffy tool for cleanup. It will hold way too much acetone. That liquid will flood onto the nail and ruin your fresh polish. You want a stiff, flat angled edge.
It should hold just enough liquid to melt the mistake away safely. I replace my cleanup tools more often than anything else. Acetone eventually eats away at the glue holding the bristles together. It is completely unavoidable.
For some excellent recommendations on high end options, I suggest reading Harper’s Bazaar recommendations. They often highlight luxury tools that are worth the investment. Sometimes treating yourself to a beautiful tool inspires you to practice more often.
How to prepare new brushes before first use
This is where ninety percent of beginners go completely wrong. You open your new package and dip the tool straight into paint. You must never do this. Manufacturers coat the bristles in a stiff starch or glue before shipping.
This protects the hairs during transit. It keeps them perfectly straight in the plastic tube. If you paint with that starch still in the hairs, they will snap and break.
You have to break the starch seal first. Use your thumb to gently flick the bristles back and forth. You will see a fine white dust fall out. Keep flicking gently until the hairs feel soft and separated.
Do not pull or tug on them. Just fan them out lightly. This process takes about two minutes per tool. It is absolutely necessary for the health of the delicate fibers.
Once the dust is gone, you need to condition the hairs. If you are using them for gel, dip them into a clear base coat. Work the clear gel into the bristles on a clean palette.
Gently wipe away the excess with a lint free wipe. The bristles are now hydrated and shaped. They are finally ready for color. Taking the time to prep your brushes for nail design extends their lifespan by months.
If you skip this step, the dry hairs will soak up your highly pigmented colors immediately. That pigment will stain the fibers permanently. Conditioning fills the microscopic gaps in the hairs with clear product first.
It acts as a protective barrier. This makes cleaning them later significantly easier. It is a small step that makes a massive difference in longevity.
Stop cleaning your tools with pure acetone
I see this mistake constantly online. People finish a beautiful design and then dunk their liner into a pot of pure acetone. That is a quick way to destroy your tools. Acetone is incredibly harsh.
It strips all the moisture from the hairs. It causes natural fibers to become brittle and snap. It causes synthetic fibers to melt and curl at the ends. It also degrades the glue in the ferrule quickly.
The best way to clean gel out of a tool is with more gel. It sounds strange, but it works perfectly. Put a drop of clear top coat on a palette. Swirl your dirty bristles in the clear gel puddle.
You will see the color bleed out into the clear gel. Wipe the bristles gently on a lint free wipe. Repeat this process until no more color comes out. The tool is now clean and perfectly conditioned.
You only need harsh solvents if you are using regular air dry polish or acrylic. If you must use a solvent, buy a dedicated brush cleaner. These formulas contain conditioning oils that protect the sensitive hairs.
Acetone has absolutely no conditioning properties. If you accidentally cure gel into your bristles, they are usually ruined. No amount of soaking will save them without destroying the shape entirely.
If you are looking to upgrade your polish collection, take a look at these top rated gel polishes. Good polish makes painting much easier. Thick, clumpy gel will ruin your lines no matter how good your tools are.
The synergy between high quality product and high quality tools is where the magic really happens.
The right way to store your nail art kit
Improper storage will bend the hairs and ruin the sharp points forever. Never store them standing upright in a cup without their caps. Dust will settle deep into the bristles. Gravity will pull residual gel down into the metal ferrule.
This causes the hairs to splay outwards. Once a liner frays, it is nearly impossible to fix. It will never paint a sharp crisp line again.
Always keep the original plastic caps. After cleaning, shape the hairs into a perfect point. Carefully slide the cap back on. Be incredibly careful not to catch any stray hairs on the edge of the cap.
Bending a single hair backward will ruin the shape entirely. Store them flat in a drawer or a dedicated carrying case. Keeping them away from sunlight is also very important.
If your tools have clear gel residue in them, sunlight will cure it. Even indirect window light can slowly harden the gel over a few days. You will open your drawer to find a rock hard clump of useless plastic.
Store them in a dark, cool place. A closed drawer or a light proof bag is absolutely perfect. Treat them with the same care you would give expensive makeup tools.
Why trimming your own bristles is a bad idea
Many tutorials suggest cutting thick brushes down to make them thinner. People take cuticle nippers and hack away at the base of the bristles. I strongly advise against this. It rarely works out the way you want.
The hairs are bound together tightly inside the metal ferrule. When you cut them, you alter the tension and balance of the entire tuft. The remaining hairs will likely splay outward aggressively.
Manufacturers design these tools with a specific taper. The ends of the hairs are naturally fine and smooth. When you cut them, you create blunt, harsh edges. These blunt edges will not glide over the nail smoothly.
They will scratch your polish and leave terrible streaks. It is much better to just buy the correct size in the first place. Good tools are not so expensive that you need to resort to hacking them apart.
If you absolutely must trim a frayed hair, only cut that single stray piece. Use very sharp scissors. Snip it as close to the base as possible. Do not try to thin out the entire body of the tool.
You will just create a ragged mess. Leave the shaping to the manufacturers. Focus your energy on practicing your painting techniques instead.
Upgrading your setup as your skills grow
You do not need luxury tools on day one. Start with a solid mid range brand. Learn how to clean them. Learn how to store them properly.
Once you prove to yourself that you can maintain them, you can safely upgrade. Buying a thirty dollar liner is painful if you accidentally cure it in the lamp on the first day. Wait until you have the muscle memory and the discipline.
As you progress, you might want to try specialized shapes. An ombre brush with staggered bristles is great for gradients. A long striping tool is amazing for plaids and grids. A tiny detailing tool is perfect for character art.
Build your collection slowly based on the designs you actually want to paint. Do not buy tools for techniques you have zero interest in ever learning.
Remember that the tool does not make the artist. The practice does. The best brushes for nail design only remove the physical barriers to success. They do not magically impart skill.
You still have to put in the hours of practice. But practicing is much more enjoyable when you are not fighting terrible plastic bristles. Check out Allure’s guide to nail tools for more inspiration on what to buy next.
Why brushes for nail design is worth your attention
More people are discovering brushes for nail design every day, and for good reason. The results speak for themselves when you approach brushes for nail design with the right information. Whether you are brand new to brushes for nail design or have been exploring it for a while, there is always something useful to learn. Taking a consistent approach to brushes for nail design over time is what separates people who see results from those who give up too early.
The most important thing about brushes for nail design is that it does not have to be complicated. A few good habits, applied consistently, will take you further than an elaborate routine you cannot stick to.
Mastering brushes for nail design Today
Success with brushes for nail design comes down to avoiding common mistakes that many beginners make. When you first start learning about brushes for nail design, it is easy to get overwhelmed. However, if you keep things simple and focus on the basics of brushes for nail design, you will see progress faster than you expect. Many people give up on brushes for nail design too soon because they expect overnight results, but patience is key when working with brushes for nail design.
Frequently Asked Questions
What is the best brush for fine lines?
A long, ultra fine liner made of synthetic nylon is the best choice for fine lines. The length absorbs hand tremors. This allows you to drag the gel smoothly for perfectly straight lines.
Can I use acrylic brushes for gel paint?
It is not recommended at all. Acrylic tools are usually made of natural kolinsky hair. This natural hair absorbs liquid. Gel paint is thick and sits on the surface, so smooth synthetic fibers work much better and are easier to clean.
How do I clean my nail art brushes properly?
Clean them by swirling the bristles in a drop of clear gel base or top coat on a palette. Wipe gently with a lint free wipe until the color is completely gone. Avoid pure acetone as it dries out the sensitive fibers.
Why is my liner brush fraying at the tip?
Fraying is usually caused by improper storage or rough cleaning. Using harsh solvents like acetone also damages the glue. Always reshape the tip carefully after cleaning and store it flat with the protective cap securely on.
How long should a good brush last?
With proper cleaning and storage, a high quality synthetic tool can last anywhere from six months to over a year of regular use. If it starts splaying or losing hairs consistently, it is definitely time for a replacement.
Do I really need to break the starch on a new brush?
Yes, breaking the starch is absolutely mandatory. Manufacturers use a stiff glue to keep hairs straight during transit. Painting with this rigid starch still in the hairs will cause them to snap and break permanently.
Read also:
- Explore more beauty tips for your daily life

One Comment